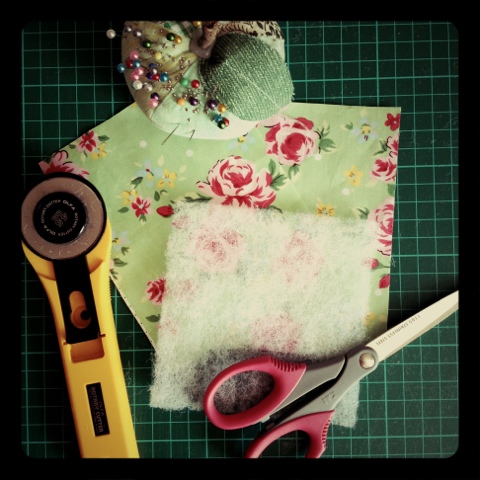
Saturday, 10 August 2013

American Pancakes

My brother Christophe lives in Alberta, Canada and whenever we go and visit they have that lovely weekend ritual of big family breakfasts with pancakes, bacon, maple syrup, blueberries, bananas, strawberries, whipped cream, fresh juice and hot delicious coffee.  We love it so much we try and do it as often as we can, and since we now have our own little family it's a lovely occasion for us, and an extra opportunity to invite people round.

I've got a recipe written in my binder and I'm not sure where I got it, but it's pretty similar to the BBC Food version, and as that's the first one that comes up on Google search I imagine that's where it's from.  But I tend to do it from memory and they turn out well, so that's what I'm going to do here.

This serves 2 adults and one very cheeky little monkey; about 9 pancakes.  We normally double up if we've got guests.


- 50g butter - cooled & melted (I normally melt this first whilst sorting the rest out so it has time to cool and doesn't cook the egg)
- 1 egg
- 130g plain flour
- 2 tablespoons of sugar (I like to use golden caster sugar)
- 135ml milk
- 1 teaspoon baking powder
- pinch of salt
- extra butter for greasing pan

1.  Whilst the butter is cooling, whisk the egg and the milk together.  I melt the butter in the pan that I'm going to use to make the pancakes so that for the first batch I don't need to re-grease as it'll have some butter residue on it.

2.  In a separate bowl mix together the flour, sugar, salt, and baking powder.  I think technically you should sieve the flour but I never bother and it's always fine!  But I suppose I should say sieve the flour, in case your flour is particularly clumpy.


3.  Pour the butter into the milk/egg and mix together.

4.  Pour the milk/egg/butter mixture into the flour etc, gently stirring constantly until mixed together.  It's the right consistency if you take a spoonful of the mixture and from about 6 inches up drizzle it back into the bowl.  If it sits on top of the rest of the batter and very slowly eases back into the mix then it should be fine.  If it's too runny add some more flour.  If it's too thick add some more milk.

5.  I like to let the batter sit for a few minutes before using it.  I think there's a technical reason for this but I'm not sure what it is.  Something to do with air bubbles?!

6.  If you have one, turn the extractor fan on.  Hot buttery pans can be a bit smokey and doing it now avoids that stable-door-bolting-horse type scenario.

7.  Get your frying pan (hopefully one for pancakes or one with low sides).  Make sure it's greased with butter for each round of pancakes.  Place on a medium heat - allow the pan to warm up.  My pan allows me to cook 3 pancakes at once.

8.  Using a large serving spoon to drop the batter into the pan will give you a good sized pancake.  Just dump it in one spot; avoid the temptation to drizzle it around.  If it's a good consistency it should spread itself slightly - aim for about 10cm in diameter.  Cook for a couple of minutes - when one or two little bubble holes appear through the batter it usually means it's time to flip them.  You can also tell how much they've cooked through by looking at the side of the pancake.  Turn over with a spatula.

9.  Cook on the other side for a minute or so.


10.  Remove from the pan.  Repeat until all the batter is used up.  You should be able to make 9 or 10 pancakes.

Serve with anything you fancy!  Maple syrup and bacon is my fave.  Be sure to invest in some proper maple syrup and don't be fooled by the cheaper maple flavoured syrup.  You can also plop a handful of blueberries into the mixture before frying your pancakes for a burst of fruity deliciousness; they are lovely on their own or with syrup and fruit.  All very yum!

Friday, 26 July 2013

Queen's Park, Brighton

Before moving to Lewes 2 years ago, I spent the previous 5 years living in houses in the Queen's Park/Hanover area of Brighton.  I've spent many sunny, and not-so-sunny, days in Queen's Park - meeting friends, walking the dog, barbecuing, drinking cider, sledging in the snow.  But it's only since going there with my toddler that I've fully appreciated all it has to offer.  Here's a quick run through:

Table tennis tables.  Obviously for quite a specific target audience.  My husband definitely sits in that bracket and was very excited to discover these.


A very extensive kids' playground with something suitable for pretty much every age.  I'm talking zip wires, sand pits, at least 4 different size slides, big wooden climbing frames, little boat shaped climbing frames, all sorts of swings, trains to sit in and climb on, water and sand games - and spread out over a huge area, which means the little ones don't get trampled on by the big ones.  Much.  Here's Jola running as fast as her little legs would carry her when she clocked the fun to be had:


There's also a little cafe and plenty of picnic tables, but I couldn't tell anything much about the food as we didn't have any.  And likewise with the toilet block, but at least there is one.


There is a large duck pond too.  Just be careful with little ones as it's unfenced.  And not really that many ducks.  A couple of geese and then mainly seagulls.  But my little one doesn't yet know the difference between a duck and a seagull so she's happy!

This is now the third time we've made the journey into Brighton for the specific purpose of going to Queen's Park.  It's ace!  On one previous occasion East Sussex Fire Service were there with one of their engines for the children to explore.  We've also been there for little J to leg it about and then have a nap in the pushchair as we walk into town and hit the shops, without feeling guilty about it not being fun for her.  The Hanover area is largely free parking too (although not the immediate roads around the park), so useful if you're going to be a while and don't mind a short walk and the hill.

A quick word of warning: whilst we were seated on a bench happily munching on sausage rolls a seagull swooped down and grabbed the sausage roll out of my husband's hand!  Beware!

Tuesday, 23 July 2013

The beach at Seaford

Since Jola was about 12 weeks old I've been a bit of a stickler for the bedtime routine. Last week I was talking to a friend on the phone after I'd put Jola to bed and she said that she was just getting her babies ready and then going to the beach for an icecream. I couldn't believe it - she was going out at 7:45! I was inspired! So a couple of days later after teatime, which always happens at 5:30, instead of getting ready for bathtime, which always happens at 6:15, we got in the car and drove down to the seaside. We only live up the road but I've never been to Seaford beach. We went to the Bishopstone end which has pedestrian walkways, ice cream, a little cafe and fish and chips. It was wonderful and I highly recommend breaking out of that routine!


Granted we probably did pay for it with a terrible night sleep but it was definitely worth it. 

Sunday, 21 July 2013

Emergency Icecreams

Knew it was going to be a scorcher but had no appropriate supplies for cool eating. Saw this on Pinterest recently and tried it out today. Brilliant!

Friday, 19 July 2013

Crafty Coasters

I made a bunch of these as Christmas presents last year and I think they fit that old cliché of simple yet effective. Choosing fabrics for particular friends can really make them more than just coasters.  My friend Rae recently acquired a new poodle and a new house, so I made a set of 4 French poodle inspired coasters for her new abode.


For each coaster you will need:
- a piece of fabric measuring 4.5" x 11"
- a piece of medium weight wadding measuring 4.5" x 4.25"
- the usual gear: pins, threads, sewing machine, scissors...

1) Cut your fabric so that you have 2 pieces each measuring 4.5" x 5.5".


2) Place your fabric and wadding in the following order: wadding, fabric right side up, fabric right side down (see photo).


3) Your piece of wadding needs to be lined up against 3 edges of your fabric.  Pin and sew around 3 edges using a 1/4" seam allowance, starting on the long edge furthest away from where your wadding is placed.  This will leave one seam open.


4) Trim corners and sewn edges.


5) Turn inside out, poke out your corners and press.  Tuck in the open edge of your coaster about 1" - measure your coaster to make sure it's square; it should be 4" square.  Press and pin.


6) You will now top stitch the coaster in a right-angled spiral.  I usually start this on the edge of the coaster before your still open seam, rather than on the open seamed edge.  Place your needle 1/4" in from the edge of the seam you'll be following, but right at the end of the coaster.  Hopefully this diagram of the spiral will help as this is the pattern your top stitch should follow:


7) Stop sewing when you're 1/4" away from the next edge - for the first 3 lines this will be the end of the coaster, but from then on you'll stop sewing 1/4" away from your previous line of top stitch.  Make sure the needle is down, lift the sewing machine foot, turn your work 90° anticlockwise, put the foot down and sew another straight line until you get 1/4" from the opposite edge or a previously sewn seam.  You will repeat this action again and again until you have spiraled into the centre of the coaster.  Do a couple of reverse stitches when you've finished to secure the thread. 


I hope this makes sense!


8)  I usually trim the threads in the centre of the coaster and knot the tails at the start of the top stitch before trimming.


Your coaster is finished!  These work as lovely gifts in packs of 4, so repeat the whole lot 4 times to complete your set!  If you're feeling super crafty you could make some matching placemats by hopping over to this tutorial by Chloe at Gannet and Parrot.


Thursday, 18 July 2013

Moules Frites aux Sœurs

I apologise if that is bad French!  I'm half French, yet those prepositions and contractions still confuse me!

Anyway...after a wonderful trip to the seaside in France a couple of weeks ago, my sister and I decided that we could definitely make our own Moules Marinière and we definitely didn't need to fall into the tourist trap and pay for a ridiculously overpriced meal.  We hastily and over-excitedly bought 2 kilos of local and very fresh mussels.  That is an awful lot of moules for 3 people, but I didn't really know how to get the fishmonger's attention and get him to stop filling the bag!

Both my sister and I assumed that the other was a dab hand at preparing this particular meal.  We get home:
     "So, what do we do?"
     "What?!  I don't know, I thought you knew!"

Uh oh.  We scoured the shelves and found a couple of old French recipe books.  Neither of which contained the right instructions.  We've both eaten moules marinière a few times in our lives so we just decided to take a stab at it!  And it turned out pretty tasty, so I thought I'd share what we did here in case anyone else finds themselves in a similar situation.

This 'recette' is for 2 kilos of mussels.  This could easily feed 4 - 6 people.

Ingredients:
2 kg of clean Mussels 
6 bulbs of some spring onions we'd used in a salad the day before - or try shallots, chopped
4 gloves of garlic, finely chopped
1.5 glasses of white wine - make sure it's a tasty one so you can enjoy a few glasses with your meal.  Or drink the whole lot whilst cooking and find something else suitable for dinner.  Of course we didn't do that.
A couple of large knobs of butter
A splash of olive oil
A large handful of fresh parsley, roughly chopped
A pinch of salt and pepper
A load of potatoes chopped up into chips
We suspect that at some point your supposed to put some cream in.  However a) we didn't have any cream, and b) we weren't sure when to put it in.  So we decided to omit it.
Before tackling the mussels, my sister used a deep fat fryer to start the chips.  On a medium heat deep fry the chips for about 6 minutes.  Remove from fryer and set aside.  Then turn up the heat as much as possible.  While the oil is heating up prepare the mussels.


1.  Find a saucepan large enough for your mussels.  Splash oil in pan, add butter, and place over a medium heat.

2.  Once butter has started to melt chuck in chopped onions/shallots and garlic and allow to soften, moving it about with a wooden spoon occasionally to prevent sticking and burning.  Make sure your pan doesn't get to hot.

3.  When the onions and garlic are nice and soft place all the mussels in the pan.  Throw over the wine, some salt and pepper, turn up the heat a bit and put the lid on.


4.  Leave the mussels to steam for about 5 minutes.  When the mussels have opened remove from the heat.  We were fortunate enough to have a glass topped pan so we could judge by our eyes rather than time, but I reckon 5 minutes will do it.  

5.  Now carefully put the chips back in the fryer for another 3 minutes.

6.  Sprinkle the parsley over the mussels, give it a stir and then place the contents of the pan in a lovely serving dish.  And serve.

7.  Remove the chips from the fryer, give them a good shake.  And serve.


Et voilà!  Bon appétit!  They were wonderful - you could tell they were fresh and hadn't travelled far.  None of that weird chewiness where you resort to an open-jawed, no biting, weak smile to convey delight and maturity of your taste buds!

Remember - don't eat the mussels that haven't opened.

Sunday, 14 July 2013

Un Petit Round Up

As a fairly new blogger on holiday I soon felt a little ill-prepared.  I really should have put something in place for whilst I was on away so that there wasn't a massive gap between posts.  But alas I didn't.  So in lieu of preparation I thought I'd give you a little round up of what we've been up to so you know I haven't just abandoned the blog.

My parents have a lovely house in a tiny hamlet called Goupilleau du Pinier on the border of the Loire-Atlantique and the Vendée regions of France.  There are only about 5 houses in the hamlet, the others inhabited by friendly French folk with fabulous French names like Didier, Catherine, Pierre and Loulou.  It was a perfect place to holiday with a little one - not too far to drive but far enough that you feel 'away' and the weather to be better, amazingly tranquil but only a short drive to towns, beaches, markets and other holiday delights.  If anyone is interested in staying there then send me a message and I'll put you in touch with my mum.

My parents' house at Goupilleau du Pinier - the perfect place for a relaxing holiday!
And here are some of my highlights...


Moules Frites - fresh local mussels with proper chips.  Deelish!  Will write about this more soon.


Family bike riding in St Jean de Monts.  I chose to ignore the little voice in my head that was saying, "Really?! A toddler on the front of the bike with no safety apparatus!?" and away we sped!


He read a whole book!  This is unheard of for a man who barely wants to sit still let alone read.  My dreams of a lazy beach holiday have been reborn!


For the last 5 years or so I've had my eye on some amazing green Mary Janes in a baby shop in Brighton.  You're right - my little girl isn't even 2 yet, but since I started popping in for presents I've had them in mind for my own little one.  When the time finally came it turned out they cost a fortune and my little girl's feet were too wide.  Imagine my delight when I came across these in a French shoe shop in the sale and just what I wanted!  You may curse me for saying this but I'm a little bit gutted that it's too warm for her to wear them straight away!


There's something really special about eating fruit straight from the tree and our first cherry picking experience didn't disappoint.  So tasty!  


I've got so many happy childhood memories of visiting Mont St. Michel; I really wanted to show Ben and Jola and start making our own memories.  We were a little disappointed to discover that you now have to park on the mainland and take shuttle buses to and from the island, which we didn't think would work with our brief visit.  I managed to persuade Ben that it'd be worth it, even if we could only stay 20 minutes.  Fortunately they both loved it!  Ben loved the Diagon Alley-esque magic of the narrow streets and tiny staircases, and Jola just loved the bus!

And now back to normality!  I'm so happy that we've come back to some lovely sunshine!